

Some anglers believe the Woolly Bugger, tied in its original way and its many alternatives catch more fish than any fly ever invented including species found in both saltwater and freshwater.
A tyer with time under his or her belt will probably have gone through, and have on hand, far more marabou than any other material. Following is a thorough look at marabou. – The editors
The history of the Woolly Bugger . .
Working with marabou and tying the Woolly Bugger
by Steve Hudson, field editor
[dropcap]W[/dropcap]hat you need to know about marabou – just what exactly is a marabou?
Definition #1 is “a bird.” Specifically, it’s a large stork found in Africa, and its fluffy under-tail feathers were a hot item among clothing and hat designers back in 19th and early 20th century Europe – good news for hat makers and clothing designers but bad news if you happened to be a stork.
Definition #2, though, is the one we’re more interested in here. Marabou is a type of feather that fly tyers love. When dry, the feathers are extremely fluffy – and in the water they come alive and respond to every tiny movement with enticing motion that most fish can’t resist.
Today’s tying-type marabou comes from chickens or turkeys rather than from storks. The material finds application in a wide range of fly tying situations, especially in forming the all-important tail of our next fly, the incredible Woolly Bugger.
We will tie one in a few minutes. But first…
How to select marabou
One of the challenges of working with marabou is the simple matter of selecting good marabou feathers. Since most Woolly Bugger tying instructions tell you to tie in the complete feather to form the fly’s tail, you’ll want a marabou feather that has long, supple fibers at its tip. Avoid feathers that look matted or lumpy, and also avoid feathers that have a section of non-marabou-looking feather on the end of the shaft or that have a stiff shaft running all the way to the tip. In other words, seek out marabou that has long, thin, uniform fibers at the end of the feather, as that will give you the best action in the water.
The accompanying illustration shows what an ideal marabou feather would look like, along with some examples of the type of marabou feathers that Woolly Bugger tyers generally try to avoid.Does that mean that “less-than-ideal” marabou feathers are automatically destined for the trash can? Not at all. In fact, it’s often possible to use such feathers for tailing by simply stripping a bundle of fibers from the shaft of the feather and then tying in that bundle to form the tail. I’ll sometimes do that if I have a feather with a great color but an unsuitable tip. But it’s easier to simply use the whole feather, positioning and trimming it (from its butt end) as dictated by the size of the hook.
 Managing marabou
The moment you pick up your first piece of marabou, you’ll come face to face with the biggest challenge of using this material – getting that marabou to behave. And there’s no doubt about it. Marabou’s fluffy nature can make it a hard material to control unless you know the trick!
With marabou, the trick is to dip the feather in water before you start to work with it. This makes the fibers cling together and makes the feather much easier to handle. Simply dunk the feather in a cup of water, stroking the wet fibers toward the feather’s tip after you do so, and the formerly unruly fibers will clump together and behave. In fact, they’ll clump together so well that you may have a hard time believing there’s really anything there. But there is.
Rest assured that once the marabou dries out it will return to its former fluffy glory – but by that point it will be securely tied into the body of your fly.
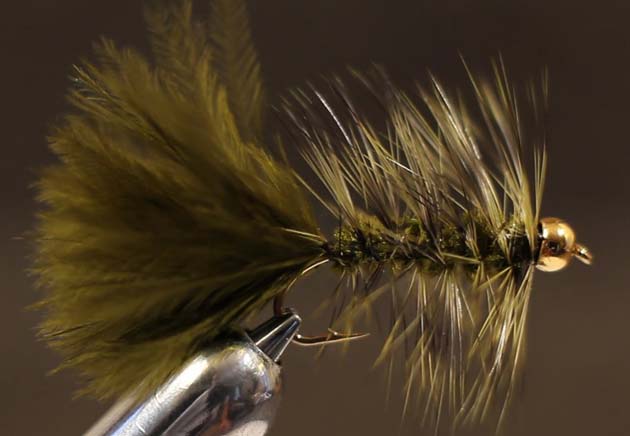
Tying the Woolly Bugger
The Woolly Bugger is a versatile fly, and it’s one that every fly tyer will enjoy tying and fishing. Woolly Buggers can be tied in a wide range of sizes. Big versions on size 4, size 2, or even larger hooks.
For day-in and day-out trout fishing, many anglers prefer Woollies tied on size 3XL or 4XL size 6, 8 or 10 hooks. Note that this is a subsurface pattern, so use a heavy hook formed from fairly heavy wire.
Here’s how the basic Woolly Bugger is tied. Next time, we’ll take it even farther and add a bead head and a bit of flash to the tail. But for now let’s keep it simple and go with the basic design.
Materials required:
Hook: Size 8 3XL or 4XL streamer or woolly bugger hook
Thread: BlackTail:
Marabou (see text) to match body color.
Body: Thread-core chenille
Hackle: Grizzly woolly bugger hackle.
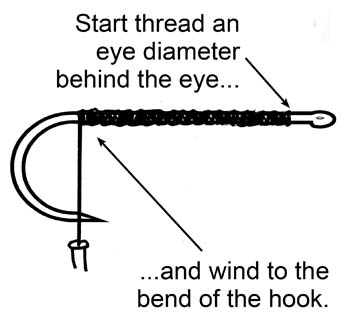
STEP 1:
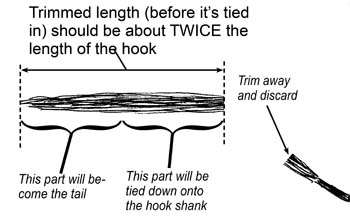
STEP 2: Select a marabou feather for the tail. Pre-trim it to about twice the length of the hook, as measured from the tip end of the feather. The tip end will become the tail; the other part is tied to the hook. To make marabou easier to handle, simply dip it in water. The wet fibers will cling together and be much easier to handle while tying.
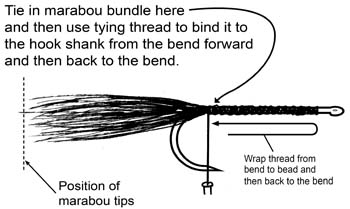
STEP 3: Before tying in the marabou tail, double-check to be sure that the tail is not too short and not too long – remember that it should extend about one hook length beyond the back of the hook.
After checking the length, use a pinch wrap to tie in the marabou to form the tail. Wrap forward over the marabou from the bend of the hook to the point where the thread base starts (that is, about an eye diameter back from the rear of the eye). Then wrap back to the bend (your original tie-down point). That gives you a smooth and bump-free base on which to form the fly’s body. Cut off the excess material at the front.
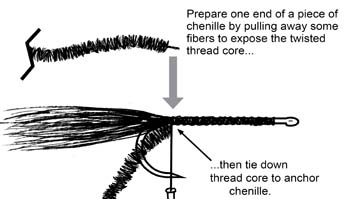
STEP 4: Cut a piece of black chenille about 6 inches long and prepare one end by pulling away about a quarter inch of the fibers to expose the twisted thread core, just as you did when tying the Woolly Worm. Then use a pinch wrap to tie in the thread core, as shown, at the bend. The chenille should now hang off the back of the fly.
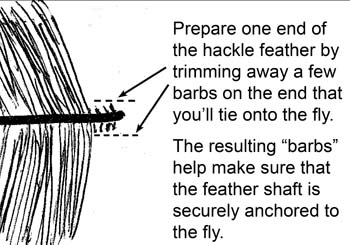
STEP 5: Choose a suitable hackle feather. An undyed “grizzly” (black and gray) feather is my first choice, but a variety of other colors will work well too. In any case, the feather’s fibers should be no shorter than the hook gape (the distance from hook shank to point). Once a feather is selected, prepare it as you did when tying the Woolly Worm – that is, by first cutting away the fuzzy part and then using the tips of your tying scissors to trim away a few barbs from each side of the butt end of the feather shaft. Then…
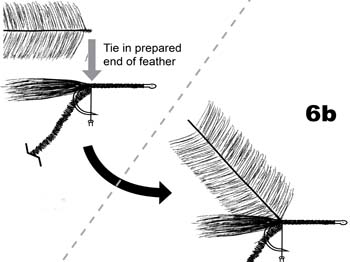
STEP 6a and 6b: …tie the hackle feather to the hook at the bend of the hook (where the chenille is tied in) with the rest of the feather hanging off the back of the fly.
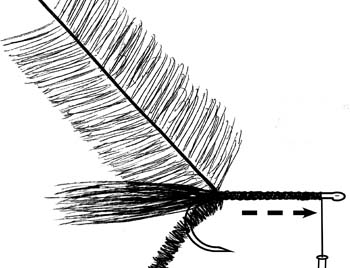
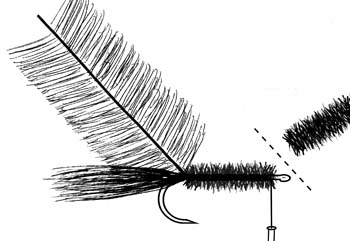
STEP 7: Then wrap the thread forward to a point about an eye diameter behind the eye.
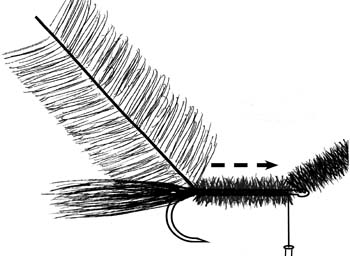
STEP 8: Form the underbody by wrapping the chenille forward in closely-packed turns to a point one eye diameter back from the rear of the eye.
STEP 9: Trim away the excess chenille.
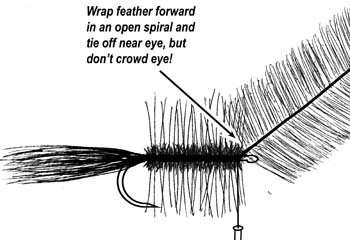
STEP 10: Wrap feather forward in an open spiral to a point near the eye.
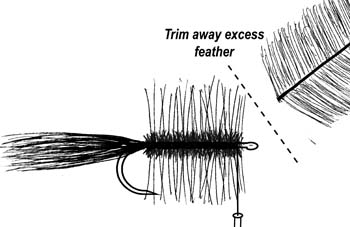
STEP 11: Trim away the excess feather.
NEXT TIME: Adding a bead head up front and some flash to the tail!
You might enjoy the Tie IT & Try It™ Woolly Bugger Fly Tying Book and Kit, available from many fly shops, on Amazon, or from my webstore.
That kit includes materials to tie at least 15 Woolly Buggers in a variety of styles, plus a 20-plus page tying guide devoted solely to tying Woolly Buggers.