


A place to keep your tools
by Steve Hudson, Editor-At-Large
[dropcap]O[/dropcap]ne challenge that every fly tyer faces is the matter of keeping up with all those tools. The solution may be as simple as an old shoe box or even a plastic bag.
But a much more elegant solution, and one that will look good on your fly tying desk is a custom-made tool caddy.
Fly tying tool caddies are easy to build and are among the most functional tying accessories you’ll find. Let’s take an hour or so and build one to help you keep track of those tools!
 Materials
The basic materials for making a tying tool caddy are inexpensive and readily available. You might even have them already. Here’s what you’ll need:
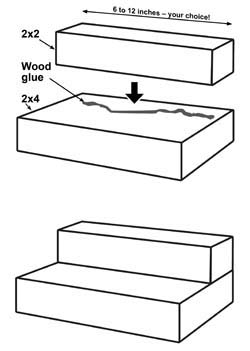
A piece of pine (or other wood) 2×4 or 2×6 between 6 and 12 inches long.
A piece of pine (or other wood) 2×2 that’s the same length as the larger piece.
A quarter-inc-diameter wood dowel
Carpenter’s (wood) glue
Sandpaper
power drill
Wood finish, if desired
A piece of adhesive-backed felt sized to cover the base of your tool caddy
Building your tool caddy
The tool caddy goes together quickly. Here are the steps:
 1) Cut the 2×4 (or 2×6) and the 2×2 to the same length. I make my tool caddies from ordinary pine, as it’s readily available and inexpensive. However, you can certainly use more elegant woods too.
2) Sand as necessary to remove rough edges to your satisfaction.
3) Glue the 2×2 to the top of the 2×4 (or 2×6) as shown, and allow the glue to cure.
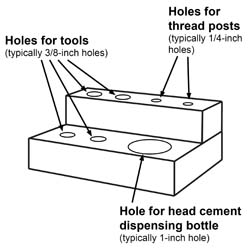
4) Think about the layout you want for the holes which will hold your various tools. Typically, you’ll drill 3/8-inch holes for tools, ¼-inch holes for thread support posts, and a large (usually 1-inch) hole to hold your head cement bottle. Spend some time considering the layout and positioning of the holes. Remember that you can’t “undrill” a hole!
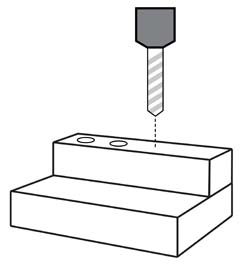
 5) Now drill the holes, using a suitable drill and suitable drill bits. When drilling, be sure to securely clamp the piece to your work table before drilling. Follow all power tool safety precautions when drilling. Also be sure that the drill is oriented correctly and not tilted when you drill.
I usually drill the holes after the basic assembly is put together, but it’s certainly possible to drill the holes before you glue the base pieces to one another.
6) Use the sandpaper to “deburr” the holes as needed.
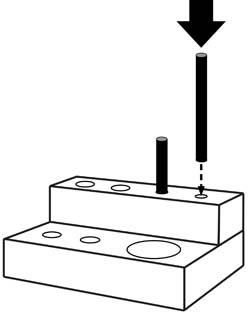
7) Cut the thread spool posts to the desired length. You’ll be driving them into the smaller holes that you drilled earlier. The post length should be such that about 1.25 inches of post is exposed after the post is seated in the hole.
8) Apply a small amount of glue to the inside of one of the small thread post holes, and gently drive one of the dowels into the hole. Repeat the process on the other thread posts. Ideally, the posts should all have the same length when installation is completed.
 9) Apply a wood finish, if desired, following the manufacturer’s instructions.
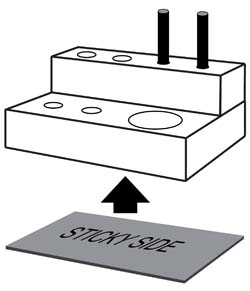
10) Once the finish is completely dry, apply a piece of adhesive-backed felt or foam to the bottom of the base. This provides a no-scratch base. Other base treatments can also be used; for example, you could use a piece of non-slip shelf liner material or even stick-on or screw-on rubber feet.
Going further
The basic tying tools caddy described here is perfectly functional, but it’s easy to take the idea to the next level if you so desire.
For example, you might want to make it three-tiered instead of two-tiered. That’s very simple to do. Just add another stairstep, perhaps using 2×8 or even 2×10 wood for the base.
Another easy variation on the basic theme is to include space for more tools. For example, you can add an additional large hole for a hair stacker. The possibilities are endless.
I think you’ll find that your homebrew tying tool caddy is a truly useful tying bench accessory. It will help you keep track of your tying tools, and that can be a big factor in making subsequent fly tying easier and more fun!
A kit of materials containing everything you need (except glue and tools) to make your own two- or three-tiered tying tool caddy is available from Chattahoochee Media’s webstore .
 Next time: Hooks
This series is based on the book A STRUCTURED COURSE IN FLY TYING, published by Chattahoochee Media and available from many fly shops, from Amazon, or direct from the author. You may want to get a copy to reference as you go through the course, for it covers many areas in more detail than we can here.
A complete kit of all tying materials needed to tie each of the flies covered in this course (as well as additional patterns covered in the book) is also available. It can be purchased directly from Chattahoochee Media by visiting the webstore.
About the author:
Steve Hudson has enjoyed fly tying and fly fishing for many years and has taught thousands of people to tie flies. An award-winning outdoor writer and illustrator, he has written extensively about fly fishing, fly tying, hiking, travel and outdoor recreation, with numerous magazine articles and more than 20 books to his credit. He lives in North Georgia.
NOTE: Featured mage Twin Peakes Fly Fishing School, introduction to fly fishing.