

Tying off the thread
By Steve Hudson
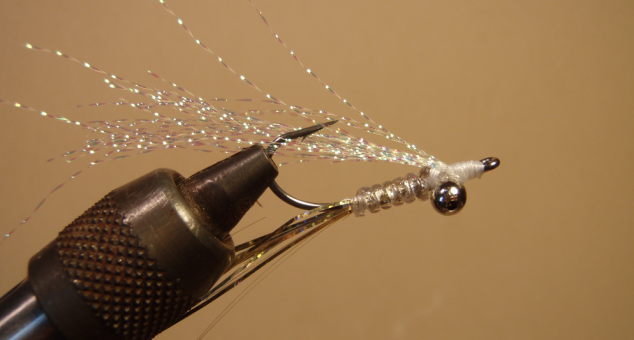
[dropcap]W[/dropcap]hen a fly tyer speaks of “tying off” the thread, what he means is that he’s adding some knot to secure the thread. There are two times when you’ll want to tie off your thread. Occasionally during the tying operation, you may want to make an interim tie-off to keep your thread from accidentally going slack. But the big tie-off time is at the end of the tying operation when the fly is done, and you’re ready to finish the thread.
There are two popular ways to tie off thread: the whip finish and the half-hitch
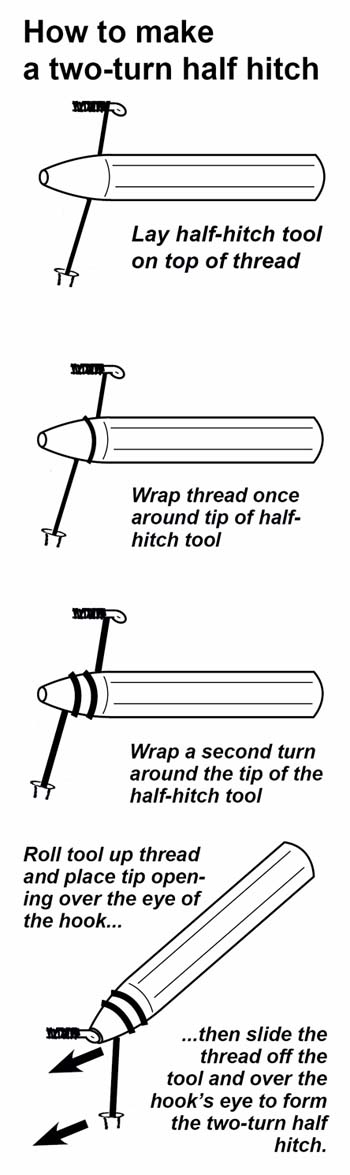
Illustration 1: Using a half hitch tool to form a half hitch.
The “whip finish” is a classic way of tying off the thread and can be tied with a whip finish tool. Unfortunately for the beginner, however, whip finish tools work in different ways. If someone teaches you to form a whip finish with approach “A,” but you happen to have tool “B” then you’ll be out of luck.
For that reason, I’ve found that a better approach for beginning tyers is to focus on a different sort of knot called a “half-hitch.” It’s easy to tie, even for beginners, and it works very well.
The half-hitch tool
One of the most inexpensive tools in any tyer’s tool arsenal is the half-hitch tool. Nothing more than a round or hexagonal rod with a tapered tip and a hollow end, it is a perfect example of functional simplicity. You need! In fact, you may already have one without knowing it, as half-hitch tools are frequently built into the “other” end of tools such as bobbin threaders and dubbing needles.
Here’s how to use a half-hitch tool. These instructions assume that you’re a right-handed tyer; reverse the rights and lefts if you’re left-handed
First, while being careful to maintain thread tension, pull out about 5 or 6 inches of tying thread.
Then pick up the half-hitch tool in your right hand. Touch the tool to the tip of our nose, and then move it to the thread so that it sits on top of the thread as shown. Note, by the way, that you don’t have to touch your nose with the tool every time you use it. Other tyers may look at you strangely if you do! But at first, when you’re learning to use the tool, touching it to your nose first is a foolproof way to make sure that you position the tool correctly on the thread.
Next, using your left hand, wrap one turn of thread around the end of the half-hitch tool. Wrap the thread in the same sense that you have wrapped it on the hook; that should be up to the front, over the top and then down the back, as shown.
Now comes the only potentially tricky part. Roll the tool up the thread so that you can position the hole in the tool’s end over the eye of the hook. Then, with the tool pushed over the eye, simply lift and tilt the tool while pulling gently on the thread. The loop of thread will slide off the tool and onto the hook, and a gentle tug will secure it.
While a single-turn half-hitch can do the job, a two-turn version does it much better. To create a two-turn half-hitch, simply wrap two turns of thread (instead of one) around the end of the tool before you roll the tool up to the eye and pull the thread onto the hook.
Tying a half-hitch without a tool
Half-hitch tools seem to be easy to lose! Every time I clean out under the cushions of the tying-room chair, it seems that I find a half-hitch tool that I’d lost sometime before.
For those times when you’ve managed to lose your half-hitch tool, here are some other ways to tie the knot.
The ballpoint pen technique
You may have noticed that the tip end of a ballpoint pen looks a lot like a half-hitch tool, and in fact, a ballpoint pen barrel can make a great tool for creating half-hitches.
First, of course, remove the ink tube. This is usually very easy to do. But note that on some pens you can’t remove the ink tube without making a mess. If your pen is of that potentially mess-making type, you’ll need to find another.
Once the ink tube is removed, you’ll be left with a pen barrel with some smooth, tapered hollow tip. If the tip opening is small, it will be great for tying small flies; if it’s large, save it for when you’re tying bigger ones. In either case, use it exactly as described earlier.
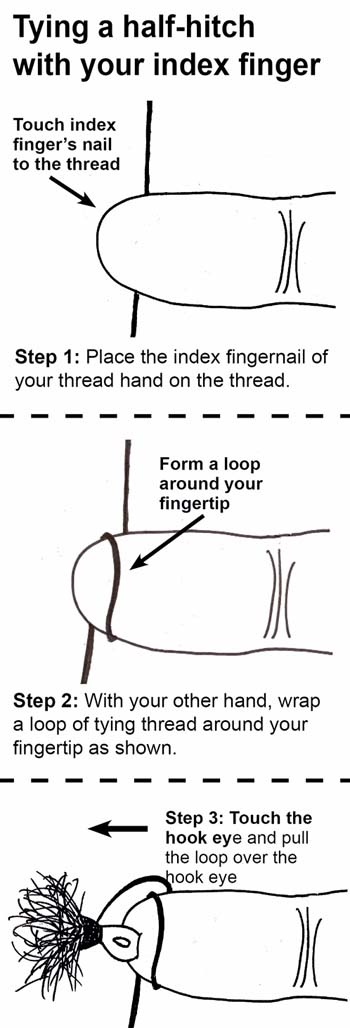
Illustration 2: Using your index finger to form a half hitch.
Tying a half-hitch with your fingers
What if you’ve not only lost your half-hitch tool but also cannot lay your hands on a ballpoint pen? In that case, you’ll want to know how to tie a half hitch with nothing but your fingers.
Here’s how to do it.
Start by pulling out a few inches of tying thread from your bobbin. Three or four extra inches is plenty. Then point left with the index finger of your right hand (as if it was the barrel of a pistol) and lay the fingernail of that finger on top of the thread. In other words, the fingernail will be resting on the thread. Again, touching the tip of your nose and then moving your finger directly to the thread helps you get everything in the right place.
Now, working as close to the end of your finger as you can, wrap one or two turns of thread around the tip of your finger. Don’t make ‘em too tight, or you won’t be able to complete the next step.
To finish, touch the eye of the hook with the tip of your thread-wrapped finger. Then gently pull the thread from the tip of your finger and over the eye of the hook. The result will be the same knot that you would get if you were using a half-hitch tool.
Homework: Practice the half hitch
The half hitch is easy to master with only a little practice. Spend a few minutes each day this week working on it, and you’ll be a half-hitch ninja by the time we’re ready to move on!
Next: Tying the Chenille Caterpillar, your first fly!
In our next installment, we’ll be tying your first fly – the Chenille Caterpillar. It’s a great learning fly, and an effective fishing fly too. You’ll enjoy it.
To tie that fly, here’s what you’ll need:
Hook: Size 8 2XL “woolly bugger” style hook
Thread: 3/0 black thread
Body: Green or olive chenille (for this fly use regular thread-core chenille and not “ultra” chenille of the type used to tie flies such as San Juan Worms)
You can pick up these materials at your local fly shop. You might also want to order Chattahoochee Media’s Tie It & Try It Woolly Bugger Kit (available from Amazon or chattahoocheemedia.com). It includes materials not just for this fly but also for the next several flies we will be tying in this series.
About the author
This series is based on the book A STRUCTURED COURSE IN FLY TYING, published by Chattahoochee Media and available from many fly shops, or direct from the author.
You may want to get a copy to reference as you go through the course, for it covers many areas in more detail than we can here.
A complete kit of all tying materials needed to tie each of the flies covered in this course (as well as additional patterns covered in the book) is also available. It can be purchased directly from Chattahoochee Media by visiting the webstore.
Steve Hudson has enjoyed fly tying and fly fishing for many years and has taught thousands of people to tie flies. An award-winning outdoor writer and illustrator, he has written extensively about fly fishing, fly tying, hiking, travel and outdoor recreation, with numerous magazine articles and more than 20 books to his credit. He lives in North Georgia.