The matter of hooks
by Steve Hudson, Editor-At-Large
[dropcap]L[/dropcap]ast time, we looked at head cement. It’s the glue that helps hold everything together once you tie a fly.
But there’s still one thing we have not looked at in detail – the all-important fly tying hook.
What’s the best hook to buy for fly tying? Now there’s a question that’ll stir up debate! Every tyer has his or her favorite hooks, and for every individual tyer that choice is the right one.
The fact is that most modern fly tying hooks are of good quality. Yes, there will be variations in the steel used, in the size of the barb, and in the relative geometries of different parts of the hook. You will quickly see those as you begin your look at hooks from different manufacturers, and you too will soon come up with your short list of favorites.
For that reason, rather than try to sort out the pluses and minuses of various hooks from various manufacturers, let’s look instead at some basic things that every tyer should know about hooks.

The majority of the flies Yellowstone Fly Goods provides are tied in the Philippines. The organization we are involved with is a non-profit organization called IDEA, or International Deaf Education Association. The mission of IDEA is to assist the Deaf in the Philippines to achieve self-reliance by providing academic, vocational, physical, spiritual, and economic opportunities. Click on image to visit Yellowstone Fly Goods.
Hook nomenclature
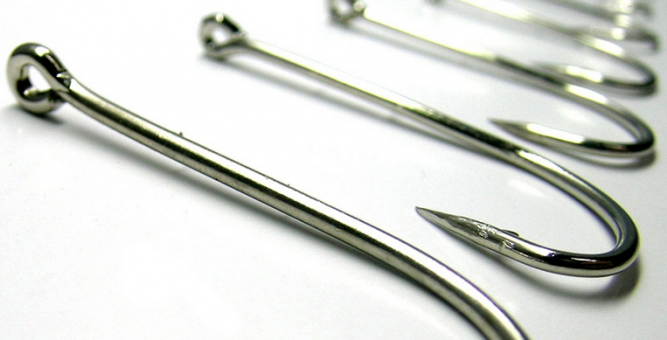
A good place to start is with the terms that describe a typical hook.
Eye: This is where you tie the leader. Eyes differ in diameter, and the “eye diameter” actually becomes an important metric when tying many flies.
Shank and shank geometry:
This is the part of the hook on which you usually tie the fly. In most cases, the hook shank is straight (as in a “straight shank streamer hook”), but it can also be curved (as in a “curved-shank emerger hook”). On some specialty hooks, such as those designed for tying popping bugs or some jig-style flies, the hook shank may be bent in various ways. You’ll want to choose “straight” or “curved” or whatever depending on the fly you’re tying, and the tying instructions will give you guidance in that area.
Shank length:
Somewhere out there, there may be secret vault which contains a piece of paper on which are recorded the “standard” shank lengths for each size of hook. But even a moment spent looking at the hook offerings in your local shop will reveal that shank lengths are anything but standard.
Most manufacturers try to help you sort this out by designating hooks as having either a “standard” shank length or a shank that’s longer or shorter than standard. Sometimes (for example, when tying flies like Woolly Buggers) you’ll want a longer-than-standard hook shank for a given hook size; at other times (for example, when tying egg imitations) you will want a shorter-than-standard shank.
Manufacturers indicate shank length by designating the hook shank as 1XL or 2XS or something similar. What does that mean? Here’s a good way to think of it. A designation of “1XL” would tell you that the hook shank is that of a hook that’s one size longer (“L”), while “2XS” would tell you that the shank is that of a hook that’s two sizes shorter.
Bend:
The bend of the hook is defined as the point on the shank at which the shank starts to transition into the bend of the hook. On a straight-shank hook, it’s the location where the straight shank begins to curve. That’s an important benchmark when tying, for you’ll often be asked to (for example) “wrap thread to the bend of the hook.”
The bend is a little harder to spot on curved-shank hooks. However, you’ll usually be able to make a very good guess about where the shank stops and the bend begins.
The term “bend” is also used to refer to the entire bend of the hook.
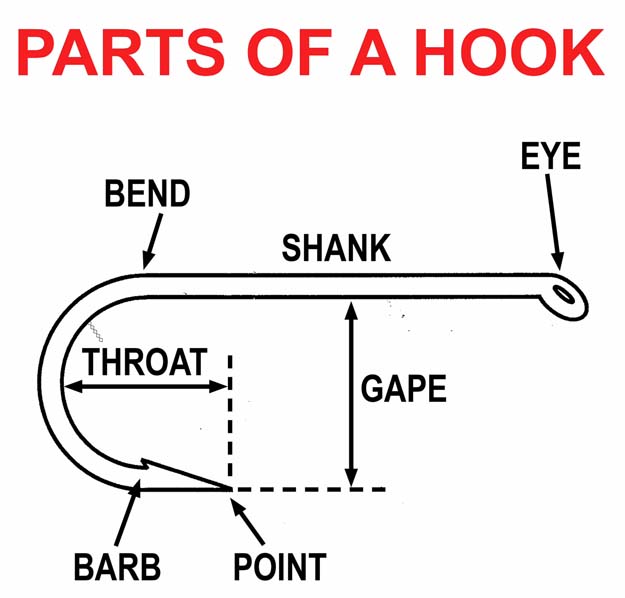
Drawing by the author. All rights reserved,
Throat or bite:
The “throat” or “bite” of a hook refers to the depth of the bend, measured from the point at which the bend begins on the shank rearward to the back of the bend’s curve.
Gape (gap):
The gape, or gap, of a hook is an important consideration in hook design. It’s the distance from the point to the shank. A small gape can make it difficult to hook fish, while an overly big gape adds weight and can affect the way the finished fly behaves in the water. You’re generally safe if you select hooks based on the other criteria and don’t worry about the gape… unless it’s obviously too large or too small.
Barb:
The barb of a hook is, well, the barb of the hook. Barbs are cut into the hook during manufacture. If the barb is cut too deeply it can weaken the point of the hook; that’s one reason that “microbarbs” are popular. Another reason for the popularity of microbarbs is that they make it easier to hook a fish compared to the same hook with a larger barb.
But do you need the barb at all? Barbed vs. barbless is another area that generates much discussion. In theory, barbed hooks hold fish better. However, many fly fishers fish barbless all the time and have no trouble keeping fish on the line.
The barbless hook makes it much, much easier to quickly unhook the fish at the end of the battle too.
To be practical about it, the biggest reason for going barbless has to more to do with the angler than with the fish. In the fly fishing world, it’s not a question of “if” you will hook yourself but rather a question of “when” you will hook yourself. If you hook yourself with a barbless hook, it’s simply an “ouch!” situation. But if you hook yourself with a barbed hook, even one with a microbarb, it’s a “*!*#@ &^@*$ !!$#*! – ouch” situation.
Most manufacturers offer barbless hooks. If you want to go barbless but can’t find barbless in the hook design you want, you can usually mash down the barb with gentle pressure from some smooth-jawed pliers.
Point:
That one’s easy. It’s the sharp place on the end.
Hook designers talk about things like “conical” points and “triangular” points and so on, but for us regular folks the important thing is whether or not that point is going to help us hook fish.
And that brings us to…
Sharpness
Certainly, sharpness is one of the most important characteristics of a fly tying hook. If the hook’s not sharp, it won’t do a good job of hooking fish. It’s simple as that.
How sharp is sharp enough? One time-honored test is to give a hook the “fingernail test.” Drag it gently across one of your nails, and if the hook point catches without you having to apply much pressure, then it’s sharp enough to use.
Most modern hooks will pass with flying colors. If one does not, sharpen it with a hook file or diamond hook hone.
But you need to sharpen it correctly.
The right way to sharpen a hook
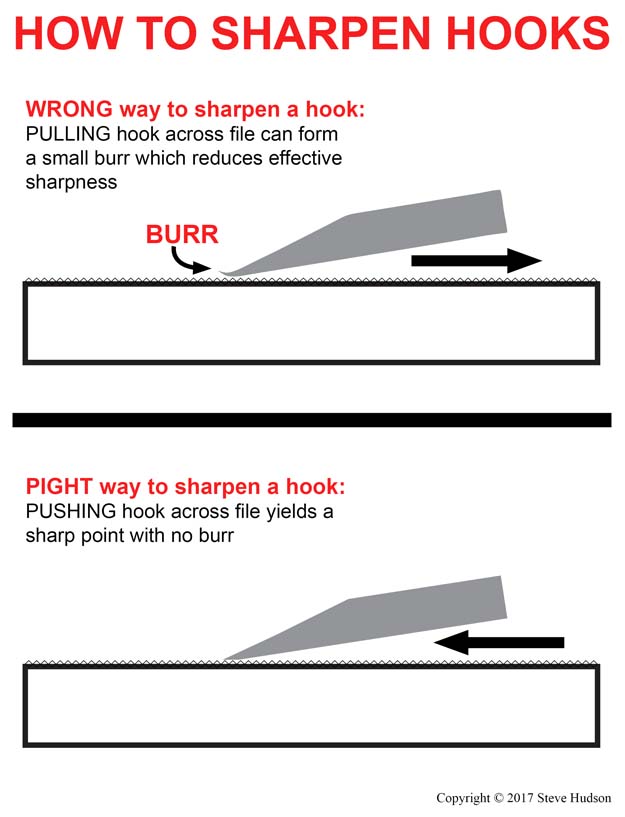
There are two ways to sharpen a hook – by pushing the hook point-first along the file or by pushing the hook point-last along the file. Both will sharpen a hook, but one seems to do it better than the other.
To see which way is best, look at what happens during the sharpening process.
If you sharpen so that the file is moving away from the point, as shown in the illustration, you will indeed sharpen the hook. But you may also be creating a tiny little burr on the tip of the point. Later, in the instant when you start to hook a fish, that burr (being relatively soft) will have to roll over before the hook starts to take hold. The effect is the same as having a dull hook, and your hook-ups may suffer.
On the other hand, if you sharpen by pulling the file toward the point, you’ll eliminate burr formation and get a cleaner point.
That’s the way I sharpen hooks – by pulling the file across the point so it’s moving toward the point. If you prefer to think of it in terms of how you handle the hook, you’ll want to push forward with the point of the hook so it moves across the surface of the file.
With some hooks, especially bought-in-bulk saltwater hooks, I must admit that I do sometimes start by pushing the file so it slides across the point and away from the point. That can speed up the initial sharpening, particularly if the hook was fairly dull to start with. But I always finish by going in the other direction to eliminate the burr – that is, by pushing the point along the file (or pulling the file so it moves toward the point, which does the same thing).
Next time: A place to keep your tools
This series is based on the book A STRUCTURED COURSE IN FLY TYING, published by Chattahoochee Media and available from many fly shops, from Amazon, or direct from the author. You may want to get a copy to reference as you go through the course, for it covers many areas in more detail than we can here.
A complete kit of all tying materials needed to tie each of the flies covered in this course (as well as additional patterns covered in the book) is also available. It can be purchased directly from Chattahoochee Media by visiting the webstore.
About the author:
Steve Hudson has enjoyed fly tying and fly fishing for many years and has taught thousands of people to tie flies. An award-winning outdoor writer and illustrator, he has written extensively about fly fishing, fly tying, hiking, travel and outdoor recreation, with numerous magazine articles and more than 20 books to his credit. He lives in North Georgia.


