

NOTE: This series is based on the book A STRUCTURED COURSE IN FLY TYING, published by Chattahoochee Media. This lavishly illustrated and easy-to-follow book has been used as the course textbook in fly tying classes from Alaska to Florida. It’s available from many fly shops or from Amazon, and signed copies are available direct from the author. You may want to get a copy to reference as you go through the course.
Add hackle to tie the Woolly Worm!
By Steve Hudson
Steve at the vise.
[dropcap]A[/dropcap]dd hackle to tie the Woolly Worm! By this point, you’re probably getting comfortable with the basic tying skills needed to tie the Enhanced Chenille Caterpillar. You’ve mastered the art of preparing and tying in chenille, and you’ve learned how to tie in a second material (in that case, red yarn for the fly’s tail). Congratulations on those new skills! You’ll use them over and over as you continue to explore the world of fly tying! That basic caterpillar is an effective fly. However, we can make it much better by the simple expedient of adding some hackle to it – and that’s what we’ll do this time. The result will be a classic pattern called the Woolly Worm, and it’s a fly that I think you’ll enjoy tying and fishing.
In addition to your basic fly tying tools, here’s what you’ll need to tie this fly
Hook: Size 8 2XL “woolly bugger” style hook
Thread: 3/0 black thread
Tailing: Red yarn
Body: Green or olive chenille (for this fly use regular thread-core chenille and not “ultra” chenille of the type used to tie flies such as San Juan Worms)
Hackle: Suitable “woolly-style” hackle feather in green, black, brown, red, or (my favorite) “grizzly” Your local fly shop should have all of these materials. You might also want to order Chattahoochee Media’s Tie It & Try It Woolly Bugger Kit. It includes materials not just for this fly but also for the next several flies we will be tying in this series. (NOTE: If you order this kit from chattahoocheemedia.com, mention that it’s for the Fly Life tying series, and I’ll make sure that there’s some extra material in there for you!).
In addition to the techniques we have used previously, we’ll be adding four new ones here:
• Choosing a suitable hackle feather
• Preparing that hackle feather
• Tying in the hackle feather
• Wrapping the hackle feather
What is hackle?
“Hackle” is the term applied to feathers which are wrapped so that the feather fibers stand out from the body of the fly. For example, a hackle feather with stiff fibers is wrapped around part of the body of a dry (floating) fly to create the familiar hackle collar seen on patterns such as the Adams or the Royal Coachman. In other cases (for example, on a subsurface fly like our current Woolly Worm) a feather with softer fibers may be preferred for better underwater action. Clearly, different types of hackle serve different purposes on different flies.
Before we go further, let’s take moment to look at four key feather-related terms. There are many others, but these four will cover us for now:
• Stem: The stem of a feather is the central shaft from which the feather’s fibers extend. It’s also called the quill or the shaft.
• Fibers: Sometimes called “barbs,” these are the individual fiber-like parts of the feather that extend out from the stem. For dry (floating) flies, the fibers should be stiff. For wet (subsurface) flies like our Woolly Worm, a softer fiber is better since it will have more lifelike action in the water
•Butt: The end of the feather that attached to the bird.
• Tip: The end of the feather opposite the butt.
 Fiber length
How long do the fibers of a hackle feather need to be? Generally speaking, the fibers of a hackle feather should have a length approximately 1 to 1.5 times the gape of the hook. Different fiber lengths yield different looks in the finished fly.
Which is best? That depends on the pattern, and tying instructions usually note specific guidelines.
Feather length and the “sweet spot”
Obviously, tyers want feathers with the right combination of fiber length and fiber stiffness – and they want as much of that combination as possible.
If you think about it, you’ll realize that what really matters in most cases is not so much the overall length of the feather but rather the length of the section of feather with fiber lengths that match what you need for the particular fly you’re tying.
This so-called “sweet spot” is the usable portion of the feather – in other words, the portion with fibers having the desired combination of stiffness and length for the particular fly that you want to tie.
How long does this “sweet spot” need to be? That varies greatly, depending on what you’re tying. A typical size 8 or size 10 woolly bugger, for example, will actually use about 3 to 4 inches of the feather (exactly how much is used is determined by how closely you space the wraps and how fat you’ve made the body). Thus, if you’re tying size 8 or size 10 woollies, you want feathers that provide that much “sweet spot” length…plus of course a little bit more to let you tie in the feather and to let you hold onto it as you wrap it around the fly.
Since feathers usually have a great deal of fuzz on the butt end and often have a fairly sharply tapered tip too, the sweet spot is going to be somewhere in the middle. Astute tyers soon learn to evaluate feathers by considering different portions of each feather’s overall length in light of the particular pattern the tyer wants to tie.
Which hackle feathers should you buy?
Even a couple of minutes at the fly shop’s tying materials wall will reveal that there are a lot of different kinds of hackle. Neck hackle…hen hackle…strung hackle…schlappen…the list goes on and on, and if you’re just getting started in all of this it can be confusing. Heck, it’s confusing even if you’ve been tying for a while!
So let’s make it simple.
Odds are that one thing you’ll see hanging there on the wall is packages of feathers specially selected for tying woolly buggers (though the package doesn’t say it, that includes woolly worms too). These can be great deals, and they take a lot of the guesswork out of the picture when it comes to selecting good feathers. So go ahead and pick up a “woolly bugger pack” from your local fly shop, for we’ll be using it quite a bit as we tie the next few flies. Simply ask at the shop for feathers suitable for tying woolly worms and woolly buggers on size 8 hooks, and you’ll be in great shape.
Initial trimming of the hackle feather
After choosing the right size feather, your next step is to prepare that feather for tying. That’s a two-step process. Step one, described here, is to cut away the “bad” part of the feather; step two, described in the paragraphs that follow, is to prepare one end of the trimmed feather for “tying in.” For our first adventures in hackling, we’ll be tying in our chosen hackle feather by the butt end. You’ll also want to experiment with tying in “by the tip” to see how that affects the look of the finished fly. But before tying in the feather, you’ve got to get it ready. That means you’ve got to cut away any unsuitable portions of the feather.
Looking at the butt end, you’ll notice two things
First, there’s a lot of fuzzy fluff nearest the butt of the shaft. That’s got to go.
But where do you cut to remove it? That brings us to the second thing you’ll notice, which is that the feather’s shaft is thick at the butt but then tapers to a more-or-less uniform size farther up the feather. Make your cut beyond the fuzzy fluff and far enough up the shaft to put you in the thinner-shaft (and thus more supple) portion of the feather.
What you’ll be left with is a feather with a supple shaft and no “fuzz” – and that’s exactly what you want for tying.
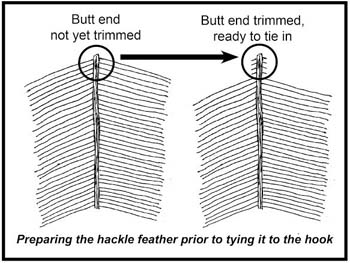
Preparing the feather for “tying in”
Tying a feather to a hook seems like a simple operation, but how you do it makes a big difference later on in ease of tying and also in the durability of the fly.
Before tying in the feather, trim the fibers to a very short length along approximately 1/16 to 1/8 of an inch of the feather’s shaft, as shown in the accompanying illustration. The result will be a very short section of shaft with tiny “teeth” on it; these will help the thread hold the feather as you tie it in. This also helps eliminate problems with stray fibers being trapped as you tie the feather to the hook. Additionally, once you start wrapping the feather around the fly’s body, this feather-prep technique helps make sure that the fibers stand out from the body correctly.
Which side where?
How should you orient the “shiny” side of the feather? For our Woolly Worm, tie in the feather so that the shiny side is away from you (that is, facing the hook) and the dull (cupped) side is facing your body. Then, when you begin to wrap the feather, see if you can keep the shiny side facing the front of the hook.
Why? Well, this affects how the fibers curve once the feather is wrapped around the hook. Some tyers don’t worry about it, but it can sometimes make a difference in the look of the finished fly.
That all-important first turn of chenille
Chenille? I thought we were talking about feathers! We are – but how you wrap the body chenille can make a big difference in the look of your finished fly. When incorporating hackle into a fly with a chenille, yarn, or dubbed body, you’ll wrap the body before you wrap the hackle. But don’t start wrapping the body material in front of the hackle feather. Instead, make the first turn of the body material behind the hackle. Then, for the second turn, the body material in front of the hackle. That has the effect of automatically straightening the fibers of that first turn of hackle, and that helps make the fibers stand up as they should.
Wrapping the feather
For many tyers, one of the most daunting tying skills is that of wrapping hackle feathers. Here, we’ll wrap the hackle feather over the chenille body, using a spiral-wrapping technique known as “palmering.” Palmering is simply wrapping the feather in an open spiral with space between the wraps. As you wrap, the feather will tend to bury itself in the soft body material, which causes the feather’s fibers to stand up at more or less right angles to the body. That gives you the desired look in the finished fly.
The only real challenge you’re likely to encounter when wrapping the hackle feather is that hackle feathers tend to be springy beasts and seem to have minds of their own. The key to taming them is to wrap hackle under constant tension. Don’t ease up on the tension at all – not even for an instant! – if you want your hackling to go well.
How much tension? You want enough tension to keep the feather taut as you wrap but not so much that you pull the feather out of the fly or break the feather’s shaft. You’ll get a feel for this as you tie, but here’s a good guideline:
• Hold the feather tightly enough so that it stays taut but also so that it still slips through your fingers.
Spacing the feather wraps
To get the best looking finished fly, make sure that the turns of hackle are spaced correctly. On our Woolly Worm, turns should be spaced no closer than about an eighth of an inch (wider spacing may be necessary, depending on the length of your feather). Consciously consider spacing as you wrap the hackle feather, and (in almost every case) go for consistent spacing along the length of the fly’s body.
What if you run out of feather as you wrap? In that case, either unwrap and then rewrap with wider spacing…or choose a longer feather next time!
By the way, on this fly, it’s a good idea to gently sweep the fibers toward the rear of the fly before wrapping the next turn of hackle. That eliminates problems with inadvertently wrapping down some of the feather’s barbs.
Should you use hackle pliers?
One potentially useful tool here is a set of hackle pliers. These spring-loaded pliers are designed to allow you to grip the tips of even very short hackle feathers, making it easier to wrap the hackle onto the fly. Good ones work well and make it easier to wrap hackle (especially when wrapping short feathers). Bad ones, however, either grip too lightly (allowing the feather to slip, usually at the worst possible time) or grip too hard — so hard that they actually crush and break the feather’s shaft.
If you find yourself fortunate enough to be using relatively long hackle feathers, then you won’t need hackle pliers most of the time. Those feathers may be long enough that you can easily handle them with nothing more than your fingers. However, if you’re wrapping with a shorter feather, then hackle pliers can really help.
The bottom line? Some tyers feel that hackle pliers are just another tool to misplace, and for that reason they may do most of their hackle wrapping using their fingers alone. However, almost every tyer keeps a set of hackle pliers somewhere on the tying bench, reaching for them when the hackle feather is too short to hold. That’s what I do, and I expect you’ll want to do it too.
Tying off the feather
When you have completed wrapping the hackle, tie it off just like you tied off the chenille – by holding the material (that is, the feather) in your bobbin hand and using your other hand to bring the thread straight over the hook (without letting it creep rearward) to form two or three stacked wraps at the tie-down point.
After tying down the hackle, it’s often a good idea to immediately add a couple of “insurance” wraps in front of the hackle (that is, around the hook shank) just to hold everything in place. These insurance wraps are especially helpful when you’re first learning to work with hackle, and they can save you from those momentary losses of tension that happen to every tyer.
Once everything is secured, use the very tips of your tying scissors to cut the feather stem close to the body of the fly. Remember, cut close. When you’re done, there should be no stubby end of the feather stem, and there should be no stray fibers pointing forward.
By the way, it’s particularly important to maintain thread tension at this point. Even a brief lapse of tension will allow that springy feather stem to uncoil.
Step-by-step tying instructions
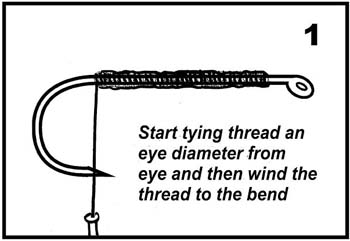
STEP 1: Start your thread an eye diameter behind the eye. Then wind a smooth thread base back to the bend.
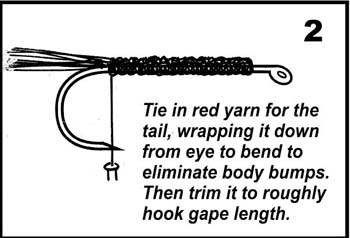
STEP 2: Cut a piece of red yarn and tie it in to form the fly’s tail. As we did on the last fly, wrap down the yarn on the hook shank from the bend of the hook up to a point about one eye diameter back from the rear of the hook’s eye. After tying in the yarn, cut the tail to a length roughly equal to the gape of the hook. After tying in the yarn, leave your thread hanging at the bend.
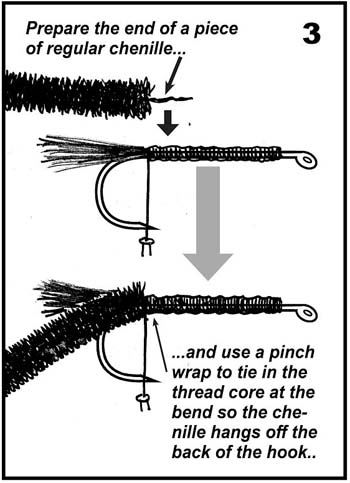
STEP 3: Prepare a 6-inch piece of chenille and tie it in just like we did on the last fly. Leave your thread hanging at the bend.
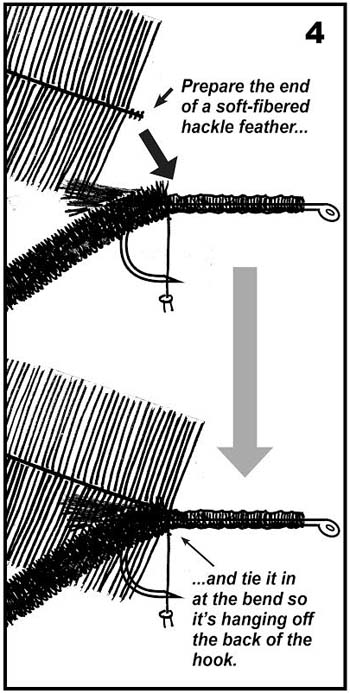
STEP 4: Select and prepare a hackle feather as described above. Then tie in the hackle feather at the bend of the hook. The feather should be extending rearward beyond the bend.

STEP 4a: Move thread forward to one eye diameter behind eye.
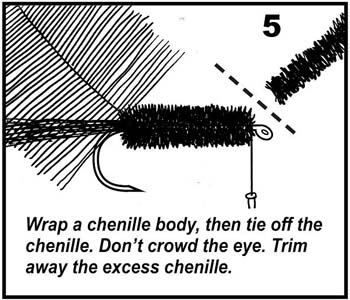
STEP 5: Now begin forming the body by making one turn of chenille behind the hackle feather. Then wrap the second turn of chenille in front of the feather. Continue wrapping the chenille forward (over the tied-down tail material) to a point one eye diameter from the eye. Tie off the chenille and trim away the excess, just as you did when tying the Enhanced Chenille Caterpillar in our previous lesson.
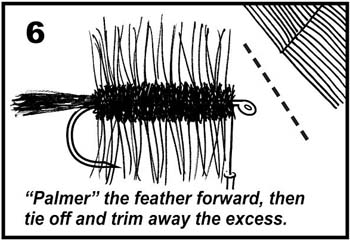
STEP 6: In this step, we will wrap (“palmer”) the hackle. That’s the key to creating the Woolly Worm. Grasping the feather firmly but not too tightly, wrap it in an open spiral toward the front of the hook. Space the turns no closer than about an eighth of an inch; a little wider spacing may be preferable. Wrap to that point one eye diameter back from the back of the hook eye, and then tie off the feather. Once the feather is tied off, add a couple of “security wraps” in front of the feather tie-off point as described earlier. Then use the very tips of your scissors to cut away the excess feather, trimming closely (but don’t cut your thread!).

STEP 7: Now form a small tapered head at the front of the fly. Use your half hitch tool to tie a couple of two-turn half hitches to secure the thread. Trim the thread, apply a drop of head cement, and you’re done.
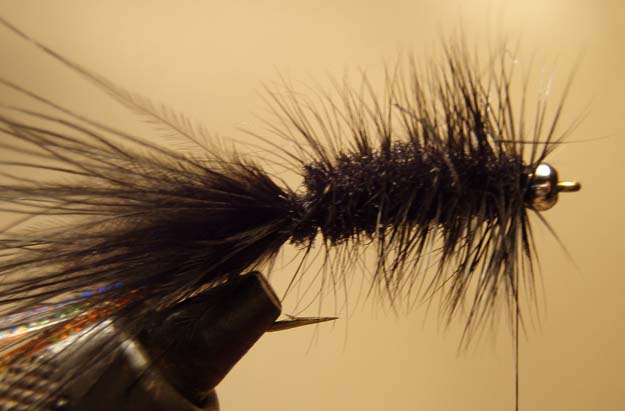
With that, your Woolly Worm is complete!
Fishing the Woolly Worm Most anglers fish the Woolly Worm as an all-purpose nymph imitation, drifting it along under a strike indicator with plenty of split shot to get it down deep. It can be fished alone or as a dropper (perhaps beneath a high-floating dry fly or even below a foam-bodied popping bug). Smaller versions, down to size 14 or so, make good all-purpose nymph or emerger imitations too. It’s a versatile pattern!
Homework:
Tie a bunch of these! Start relatively large, but try some smaller ones too. On the smaller ones, reduce the amount of yarn in the tail by pulling a piece of tailing yarn apart lengthwise…and hackle with feathers which have shorter barbs.
Featured Image: Photo by Mike Cline – public domain image.
NEXT TIME: Tying the legendary Woolly Bugger!
About the author:
Steve Hudson has enjoyed fly tying and fly fishing for many years and has taught thousands of people to tie flies. An award-winning outdoor writer and illustrator, he has written extensively about fly fishing, fly tying, hiking, travel and outdoor recreation, with numerous magazine articles and more than 20 books to his credit. He lives in north Georgia.