


Enhancing the basic Chenille Caterpillar Fly
By Steve Hudson
[dropcap]A[/dropcap]dding that red yarn tail to a basic Chenille Caterpillar Fly does two things for us. First, it allows us to practice adding the second material, a necessary step toward tying more complex multi-material flies. There are some special considerations when adding tailing to flies, too, and this pattern lets us look at and practice them.
Second, from a fishing point of view, that red tail enhances the effectiveness of the pattern. There’s something about adding a splash of red that seems to make a lot of flies work better, and this one is no exception.
In addition to your basic fly tying tools, here’s what you’ll need to tie this fly:
Hook: Size 8 2XL “woolly bugger” style hook
Thread: 3/0 black thread
Tailing: Red yarn
Body: Green or olive chenille (for this fly use regular thread-core chenille and not “ultra” chenille of the type used to tie flies such as San Juan Worms)
As with the other patterns, we’ll be tying, you can pick up these materials at your local fly shop. You might also want to order Chattahoochee Media’s Tie It & Try It Woolly Bugger Kit. It includes materials not just for this fly but also for the next several flies we will be tying in this series. (NOTE: When ordering, mention that it’s for the Beginner Fly Tying, and I’ll make sure that there’s some extra material in there for you!)
Here are the techniques we’ll be using to tie this fly:
Starting thread
Preparing and tying in the red yarn tail (NEW!)
Preparing and tying in chenille
Wrapping and tying off the chenille
Finishing the fly with a thread head
Tying off and trimming the thread
Adding the tailing
In a fly recipe like the one included here, the materials are typically listed in the order that they’re used. Here, you start with the hook…then start your thread…then add the tailing…then add the chenille.
Let’s look more closely at the matter of adding that yarn tail.
Most yarn, by nature, is bulky. When you tie in some yarn on your hook, it will add a significant amount of bulk at the point where it’s tied in. Tyers sometimes take advantage of that fact and use it intentionally to achieve bulkier bodies on the flies that they tie.
The challenge comes at the point where the tail material ends
Let’s say that you tie in a short piece of yarn with the end of the yarn about halfway up the hook shank. Tying in the yarn in that way will result in a “bump” or “step” on the hook shank at the point where the yarn ends. That bump or step will be reflected in the profile of the finished fly’s body – and that’s not what you want to see.
With a bulky material such as yarn, one solution is to tie in the yarn so that it underlies the entire body of the fly. The Step 3 illustration shows how this should be done. Essentially, you’re tying the yarn to the hook so that the end of the yarn falls about an eye diameter back from the rear of the eye, as shown in the illustration.
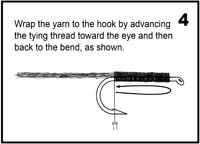
To tie in the yarn this way, make the initial tie-in at the bend of the hook. Then, and while continuing to hold the yarn in place atop the hook, wrap the tying thread forward to bind down the yarn. This is easy to do if you “chase” the thread with your pinch-wrap hand by sliding your pinch forward (toward the eye) as you tie down the yarn.
Once you reach the end of the yarn (about an eye diameter back from the rear of the hook eye), wrap the thread back to the bend and tie in the next material (the chenille).
Could you tie in the chenille first and then tie in the tailing? Sure. In that case, you would tie in the chenille, tie in the yarn, and wrap the thread forward to bind down the yarn. There would be no need to wrap rearward again, and the result would be a slightly slimmer body profile (since it will have one less layer of thread wraps). Choosing one approach or the other gives you, even more, control over the look of the finished fly.
For now, and to give you, even more, practice handling thread, let’s tie in the tail first, wrap forward and back to the bend to tie it down, and then tie in and wrap the chenille.
How long should the tail be?
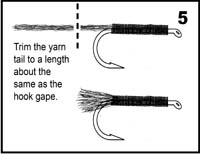
 Ahh, there’s a key question! On this fly, the tail should have a length approximately equal to the gape of the hook. Many tyers will go ahead and cut the tail to length once the yarn is tied in. Others will wait and cut it to length later.
If you wait until the tail is finished to cut the tail to length, however, you’ll have to contend with that long piece of yarn hanging off the back of the hook. One way to deal with it is to secure it in a “material clip,” which is nothing more elaborate than a spring wrapped around the main barrel of your tying vise. Many vises come with those clips; if yours does not, check with the local hardware store for a suitable spring. Simply wrap the spring around the barrel of the vise, hooking it onto itself to hold it in place. Then, to anchor the material, simply slip the material between the turns of the spring. That’s all there is to it!
 Step-by-step tying instructions
STEP 1: Start your thread an eye diameter behind the eye. Then wind a smooth thread base back to the bend.
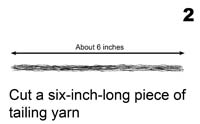
STEP 2: Cut a piece of red yarn about six inches long. That’s much more than you’ll need, but that way it will be long enough for easy handling. Make sure that the cut end is cut cleanly (that is, with no stray fibers sticking out).
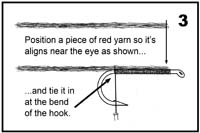 STEP 3: Position the yarn atop the hook so that the cut end is about one eye diameter back from the rear of the hook eye. Use a pinch wrap to tie in the yarn at the bend. Make sure that the front of the yarn stays in the right place (that is, about an eye diameter back from the rear of the hook eye).
STEP 4: Tie down the yarn by wrapping the thread forward and then back. “Chasing” the thread by sliding your pinch-wrap fingers along the hook shank makes that easy to do.
STEP 5: Cut the tail to a length roughly equal to the gape of the hook.
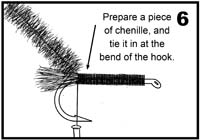
 STEP 6: Cut a six-inch length of chenille and prepare one end of it as discussed last time (by using your fingernails to strip the fuzzy part of the chenille off of the thread core). Now tie in the thread core so that the unstripped part of the chenille is hanging off the back of the hook. Tie it in securely.
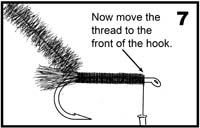
STEP 7: Now wrap the thread back to the front of the hook so that it’s about one eye diameter from the back of the hook eye.
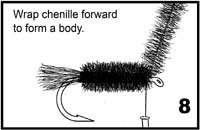
STEP 8: Wrap the chenille forward (over the tied-down tail material) to a point one eye diameter from the eye. Remember to stroke each turn back before you make the next one. Space the turns closely for the best looking body.
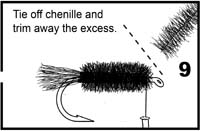
 STEP 9: Tie off the chenille and trim away the excess, just as you did when tying the basic Chenille Caterpillar in our previous lesson.
STEP 10: Wind a distinct thread head (most caterpillars have prominent heads) behind the eye. Then finish the fly with two two-turn half-hitches. Finally, trim the thread and apply head cement.
 Fishing the Enhanced Chenille Caterpillar
The Enhanced Chenille Caterpillar is fished just like the Chenille Caterpillar. Simply let it drift along near cover or overhanging vegetation – the closer to it the better. It’s imitating a caterpillar that has fallen from a branch, so you’ll do best if you keep it as close as possible to brushy areas. Fish it on a fairly tight line so you can detect strikes, but don’t drag it. However, you might try giving it a twitch now and then to make it resemble a natural caterpillar that’s struggling against the water. You can also add split shot and fish it deeper if the situation dictates. It’s effective on trout water as well as on warm water.
 Homework: Tie a bunch of these! Start relatively large, but try some smaller ones too. On the smaller ones, reduce the amount of yarn in the tail by pulling a piece of tailing yarn apart lengthwise.
Next Time: Adding some hackle to tie the legendary Woolly Worm!
 This series is based on the book A STRUCTURED COURSE IN FLY TYING, published by Chattahoochee Media. This lavishly illustrated and easy-to-follow book has been used as the course textbook in fly tying classes from Alaska to Florida. It’s available from many fly shops or from Amazon, and signed copies are available direct from the author. You may want to get a copy to reference as you go through the course.
About the author:
 Steve Hudson has enjoyed fly tying and fly fishing for many years and has taught thousands of people to tie flies. An award-winning outdoor writer and illustrator, he has written extensively about fly fishing, fly tying, hiking, travel and outdoor recreation, with numerous magazine articles and more than 20 books to his credit. He lives in north Georgia.
Featured Image: Fall, West Palisades of the Chattahoochee River, Georgia. Photo U.S. Department of the Interior.
Join the discussion One Comment