

Thread handling basics – tying materials to the hook
By Steve Hudson

Steve at the bench tying at a North Georgia fly shop. Note: Seizmore image.
[dropcap]L[/dropcap]ast time we looked at the all-important matter of starting your thread on the hook. Now let’s go to the next step and learn how to tie a material onto the hook.
Thread skill 2: Tying materials to the hook
Though there is a fly pattern that consists of nothing but thread (it’s the “thread midge”), most flies incorporate multiple materials. Some flies are simple and use only a single material; others are much more complex and use a half dozen or more different materials. But in every case, those materials have to be attached to the hook. Thus, understanding the correct way to attach materials is a critical factor in your future enjoyment of fly tying.
The wrong way to tie down materials
To understand the right way to attach materials, it’s helpful first to look at the wrong way.
For many beginners, the wrong way goes something like this. Material (say, a piece of yarn) is to be added to the hook. The tyer lays the material on the hook and then makes a tight wrap of thread in an attempt to trap the yarn and tie it down. But instead of catching the yarn, the thread simply pushes it around the hook. Undiscouraged, the tyer tries again – and again the thread simply pushes the yarn out of the way. After a half dozen tries, this becomes aggravating!
What is going on?
Well, the problem stems from two things: the nature of the material and the nature of the thread. Many tying materials, including yarn, chenille, many tailing and winging materials, and many feathers – in other words, just about everything – have a very low stiffness factor. In other words, they’re fairly soft and limp. To the fly tyer, this means that they don’t have enough rigidity to stand up to much in the way of force…not even to the force that’s applied by a piece of taut tying thread. Under even moderate tension the thread itself becomes essentially rigid and can push the tying material out of the way, making it impossible to tie said material to the hook. In fact, if you try to tie down any soft and flexible material with tensioned thread, the relatively stiff thread is simply going to push the softer material out of the way without trapping it down at all.
You can prove this to yourself by trying to tie down a piece of yarn using the “wrong” technique. Hold the yarn so that about a half inch of it is sticking out between the thumb and index finger of your left hand (if you’re a right-handed tyer) and then, while keeping tight tension on the thread, try to tie down the yarn. It will be difficult, as the thread will “chase” the yarn out of the way without tying it down.
The right way: Using the “pinch wrap”
To solve the problem, use what’s called a “pinch wrap” when tying down most materials. This handy technique is easy to master and very effective for tying down a wide range of otherwise troublesome materials.
Here’s how to do it, assuming you’re a right-handed tyer. If you’re a left-handed tyer, simply reverse the rights and lefts.
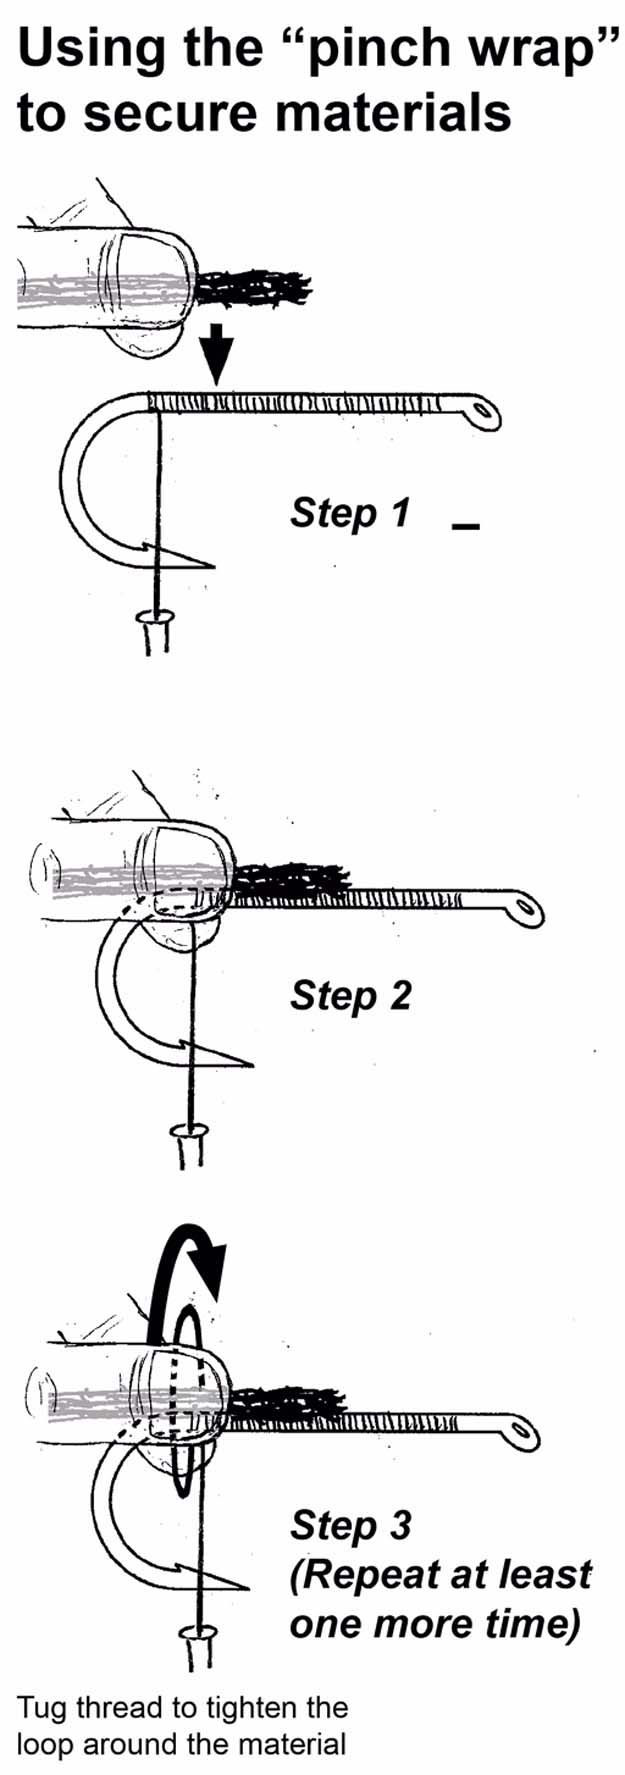
Step 1: Start by positioning the thread where the material is to be tied in. For tying in tailing materials, which are almost always tied in at the back end of the hook shank, this will typically be at the bend of the hook. For other materials located elsewhere on the fly body, it may be somewhere else. Then pick up the material, grasping it between the thumb and index finger of your left hand. Part of the material should be sticking out from between your pinched-together thumb and index finger.
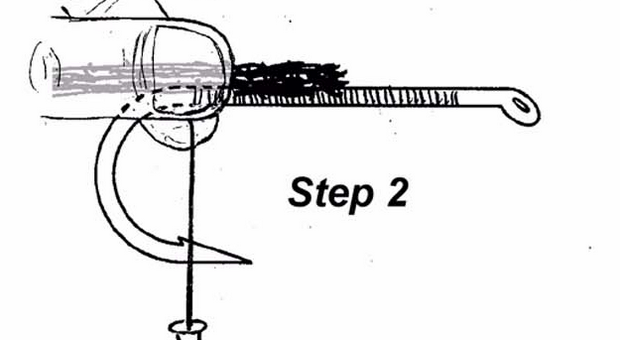
Step 2: While still grasping the material, press the material down onto the shank of the hook. You want to be sure that you are pressing down enough so that the material is pressed against the hook shank and so that it is positioned exactly where you want to tie it in.
Step 3: The final part of the pinch-wrap technique is to make a loop of thread around the pinched-down material and then tighten that loop without allowing the material to rotate around the hook. You will be forming that loop between your pinched fingers. To do so, first pull the thread up and between your pinched fingers on the near side of the hook. You’ll end up with the bobbin holding the thread more or less straight up above the hook. Maintain the pinch! Use a relatively short length of thread; an inch or two is fine.
Then, still working with that fairly short thread, and still being careful not to release the “pinch” you have on the hook shank and material and thread, pull the thread straight over the hook and down the back side of the hook and material (that is, down the side opposite you). Continue to hold the pinch (in other words, don’t ease up on your finger pressure). The thread will again pass between your pinched fingers as it is pulled down the back side of the hook, and when you’re finished with this part, the thread will be hanging below the hook.
And still, do not release the pinch!
 What you have done, to this point, is put a single wrap of thread around the material while simultaneously holding the material on the top of the hook. Your grip on the material has kept it from moving around the hook shank. But to make sure that the material stays in place where you want it, you’ll need to add at least one more wrap in the same manner.
Still holding the pinch, tug gently on the thread to tighten the loop around the material. Then (still maintaining the pinch) repeat the process to add a second pinch wrap, maintaining the pinch on hook and thread and material all the time. Finish by pulling the thread tight, and your material will be securely tied down onto the top of the hook.
In most cases, as long as you don’t allow the thread to go slack, this will hold your materials right where you want them. Until you get the hang of it, you may want to use three or (at first) even four pinch wraps to tie down materials. But after just a little bit of practice, you’ll be able to make great pinch-style tie-down wraps with just two wraps of thread.
Once the material is tied down, it’s a good idea to immediately add a few more wraps to securely bind it to the hook.
Most tyers consider the pinch wrap to be high on the list of critical skills that every fly tyer needs to master. I agree, and I suggest that you practice it until you’re comfortable with your ability to tie down any material using just a couple of pinch-wrap turns.
And that’s your homework: practice pinch wraps! Get a short piece of yarn, and practice tying it to the hook. You’ll be a pinch wrap ninja in no time, and that moves you one step closer to tying your first fly.
NEXT: “Tying off” the thread
This series is based on the book A STRUCTURED COURSE IN FLY TYING, published by Chattahochee Media and available from many fly shops, from Amazon, or direct from the author.
You may want to get a copy to reference as you go through the course, for it covers many areas in more detail than we can here.
A complete kit of all tying materials needed to tie each of the flies covered in this course (as well as additional patterns covered in the book) is also available. It can be purchased directly from Chattahoochee Media by visiting the webstore.
https://flylifemagazine.com/wp-admin/post.php?post=45152&action=editAbout the author:
Steve Hudson has enjoyed fly tying and fly fishing for many years and has taught thousands of people to tie flies. An award-winning outdoor writer and illustrator, he has written extensively about fly fishing, fly tying, hiking, travel and outdoor recreation, with numerous magazine articles and more than 20 books to his credit. He lives in North Georgia.
Sponsored